
Be sure to check out the previous posts in the series:
Recap
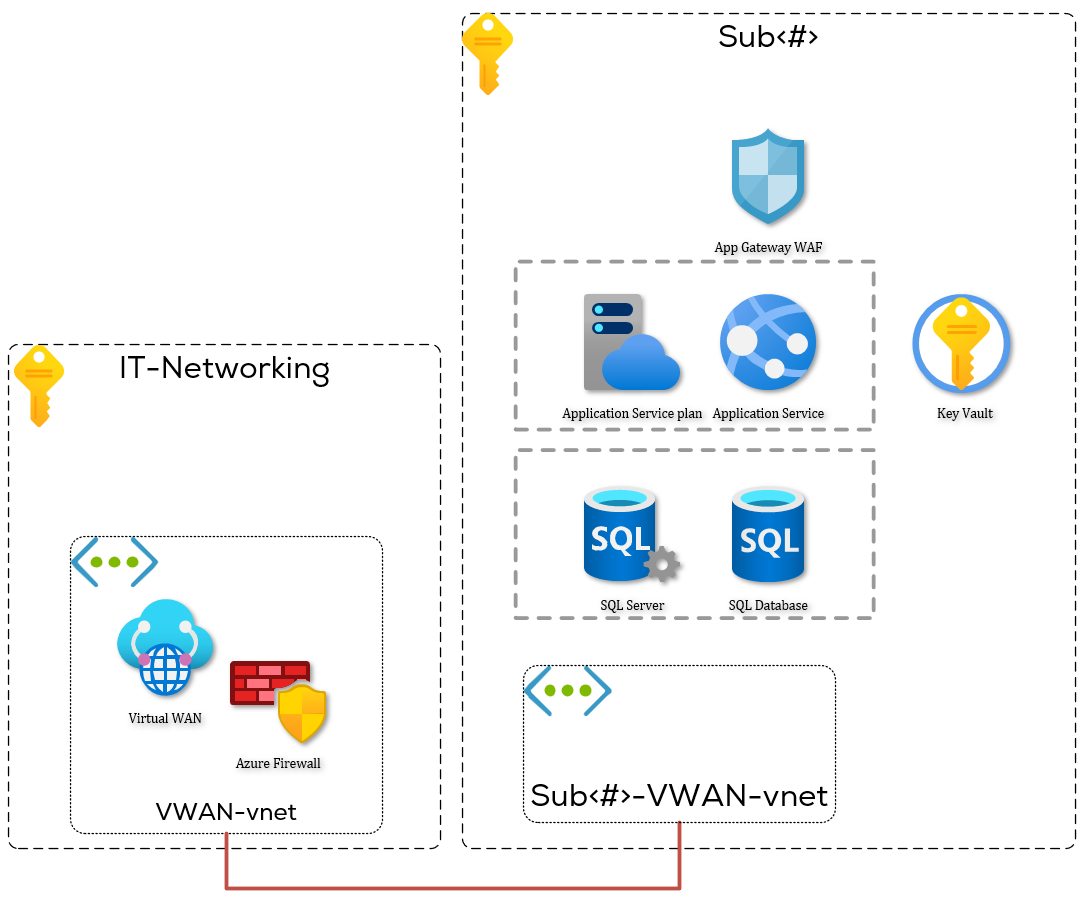
I’m still working on the basics: an Azure App Service, an Azure SQL Database and a keyvault.
What we wanted to do, as per the requirements:
- The app service should not be accessible through the public internet without passing a WAF,
- The SQL server should not be accessible from the public internet,
- The key vault should not be accessible from the public internet.
- Web pages / API’s should be served per requests.
So far, we have looked at why we need a WAF and what private endpoints will do for app services. What we will need to do next is create a secured networking environment for the resources. It is important to realise that when setting up private endpoints for app services, the app service is only accessible from inside the network. The FQDN will resolve to a private record not accessible from outside the network environment. For the SQL and key vault services, the same recommendation stands: only internal access allowed. We’ll get into the specifics of the how in the next posts.
Since app services with private endpoints lock down public access, the build server needs to have network line of sight to deploy to it. Line of sight in this context means it needs to be able to resolve the DNS record and it needs to be able to connect to the IP address the DNS record points to. This is well documented in the ADO docs.

This means we need to maintain ADO build servers on the network. The Microsoft hosted ADO build servers don’t run on our network, nor is there a capability we can use to connect a server to our network.
Let’s assume an IT department wants to centralize the ADO build servers in a separate network segment and not spread them around across azure, a high-level design can then look like this:
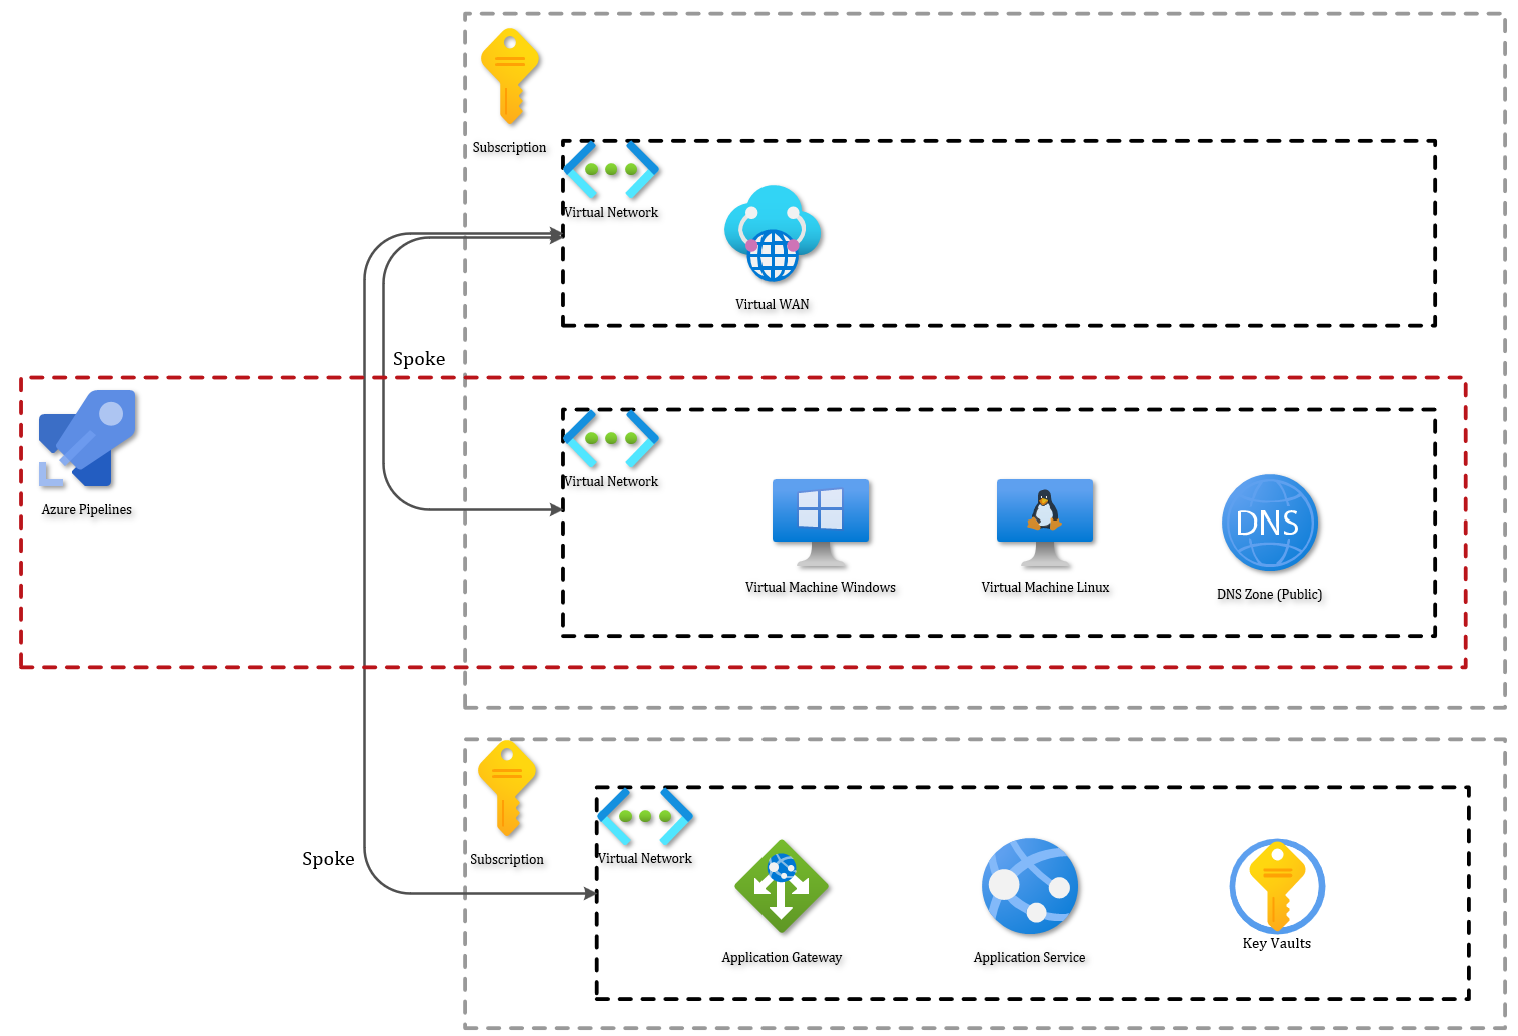
The DNS part is particularly interesting, but we’ll deep dive into it in a later part the series. At this time, you should have the mental model that there are multiple VNET’s. One for the application, one for the ADO build servers and other VNET’s for whatever might be necessary to get things running in a larger environment.
The problems with build servers
The big question: What do you want to build?
.net framework applications? .net core? java? python? VM images? … the list is endless. Setting up a build server, installing all tools and maintaining it can be a big undertaking. Especially since you don’t want to impact the developers too much. If their pipelines run on public Microsoft hosted servers now, their pipelines will be using several tasks that won’t work if you don’t install the necessary tools. After all, you don’t want to ask them to rewrite all their YAML pipelines, just so that they can run their stuff on your ADO VM’s. That won’t help adoption of the security measures one bit.
Since you want to be compatible with the Microsoft hosted Azure Devops build servers you would need to figure out if there’s a list of installed tools. And it turns out, there is such a list! The list of installed applications on the windows server 2022 with visual studio 2022 is listed here. It’s got a ton of tools in it. If you need to maintain that image yourself, it could become a lot of work. Especially since most ops people are not familiar with dev build tooling.
The question then becomes would it be possible to deliver the same capabilities as the Microsoft hosted build agent without managing the contents of the VM? The answer is yes, and I’ll get to it in the next paragraph.
The solution: Azure Devops open source virtual environment
The ADO team is kind enough to offer their configuration of the build server up in an IAC way in their github repo. The steps in this post are copied from the article on that repo, but with some minor tweaks to help you stay on track.
Lessons learned
Before you continue with testing what is in the remainder of this post, these couple of lessons learned with this repo might save you some time.
Build time
If you’re expecting this to be a 10-minute build you’re wrong. My Microsoft Windows Server 2022 image build took between 3 hours 30 minutes and 4 hours 30 minutes. Put the build on, leave the console open and do something else in the meantime. Check back every so often.
Stable branch
Simply using the stable branch didn’t get me the desired result on the first try. On my first tries the master branch wasn’t fully functional. You can troubleshoot it of course, but if you’re in a pinch for time you want stable quickly. So, if you want stable, go to the releases page. Find a release for the OS you’re trying to build and use that tag to checkout on your local directory.
git checkout tags/sometag -b mybranchname
or -
figure out how to debug your packer build
at this point, I’ve mostly gone for the first option. It hasn’t failed me yet.
Azure PowerShell module issues
I try to keep my az powershell modules up to date, but sometimes they’re not the latest and
greatest. When I redid my tests for this series, there was an issue with a particular version of
PS module. I received errors that the service principal could not be created. Simply updating
the modules worked this time. Dig around in the issue tracker if you encounter issues.
With the warnings out of the way, let’s continue to build the build machine…
Building the VM
Phase 1: create the VHD
The first step is creating the VHD file which will be used to create the Azure VM. To do that,
some prerequisites need to be set up on your host:
- Az powershell module
- Az CLI
- Packer
You first need to install the packer tool on the host you’re going to start this script on. Packer is the orchestration tool used to configure the build VM. Installing packer is a breeze if you are familiar with Choco. In case choco is new to you, check out https://chocolatey.org/. If you have Azure Cli or the Azure Powershell module you can skip those steps.
choco install packer -y
Install-Module -Name Az -Repository PSGallery -Force
Invoke-WebRequest -Uri https://aka.ms/installazurecliwindows -OutFile .\Azure
Set-Location c:\
git clone https://github.com/actions/virtual-environments.git
Set-Location C:\virtual-environments

Import-Module .\helpers\GenerateResourcesAndImage.ps1

$params = @{
  SubscriptionId = "subscription id"
  ResourceGroupName = "rgname"
  ImageGenerationRepositoryRoot = "$pwd"
  ImageType = "Windows2022"
  AzureLocation = "West Europe"
  # AzureClientId = "application-id"
  # AzureClientSecret = "application-secret"
  # AzureTenantId = "tenant id"
}
GenerateResourcesAndImage @params
You may want to change the directories ;-).
For some reason, they didn’t automate the script 100%, you’ll get an output with 2 downloadlinks. They’re the same, but one with a secure download link. Download the file to c:\buildimage. The file is an ARM template with a link to the VHD.
The commented out application
As you can see, three params are commented out. They all have something to do with an Application Registration. If you omit these parameters, the script will create an AD application and service principal and give it the contributor role to the currently selected Az context scope (meaning: subscription).
The script should auto-remove that application after completion, if you don’t prematurely exit the script.
If you want to control the lifecycle of the application that this script runs with and the scope of the role assignment, you need to:
- Create a new app registration (single tenant)
- Create the resource group you want to create the build server VM in
- Give the newly created app contributor access
- Fill in Client Id, Client Secret and tenant ID in the parameters
- Let the script run
Phase 2: create the VM in Azure
Due to a shortcoming of the create VM from image script, the existence of the resource group is not checked and thus not created if it does not exist. Create it if it does not exist before you start this script.
You can of course use the same one as you used for building the VHD.
Set-Location C:\virtual-environments

Import-Module .\helpers\CreateAzureVMFromPackerTemplate.ps1

$createVmParams = @{
    SubscriptionId = "subscription Id"
    ResourceGroupName = "resource group for the vm"
    TemplateFile = "C:\BuildVmImages\temporaryTemplate.json"
    VirtualMachineName = "testvm1"
    AdminUsername = "shady1"
    AdminPassword = "SomeSecurePassword1!"
    AzureLocation = "west europe"
}
CreateAzureVMFromPackerTemplate @createVmParams
What you’ll see is that a VM has been created but no managed disk is there. This is because the VM is created using an unmanaged disk. If you dig into the storage account, you will find a large file that acts as an unmanaged disk for the VM.
The script above creates a VM using unmanaged disks. Luckily, converting from unmanaged to managed disks is easy. On: https://docs.microsoft.com/en-us/azure/virtual-machines/windows/convert-unmanaged-to-managed-disks you can find how to convert from an unmanaged disk to a managed one.
This is the script you will need to run for migrating to managed disks. Changing to managed disks allows you to set the performance level of the disk, and other advanced features, more easily than if you were to be keeping the unmanaged disk.
# Convert to managed disks
$rgName = "myrgname"
$vmName = "myvmname"
Stop-AzVM -ResourceGroupName $rgName -Name $vmName
ConvertTo-AzVMManagedDisk -ResourceGroupName $rgName -Name $vmName

# Change disk performance
$diskName = "mydiskname"
$disk = Get-AzDisk -ResourceGroupName $rgName -DiskName $diskName
$disk.Sku.Name = "StandardSSD_LRS"
Update-AzDisk -ResourceGroupName $rgName -DiskName $diskName -Disk $disk
Build serverup. Now what?
At this point, you should have a VM running in azure and that VM uses managed disks rather than unmanaged disks. In terms of registering the VM as a build agent in your Azure Devops environment and executing builds on it, that has not happened yet. That still must happen. If you are not familiar with how that is done, you can find the steps on how to do that on this page: https://docs.microsoft.com/en-us/azure/devops/pipelines/agents/agents?=view=azure-devops&tabs=browser#install.
Hope this helps!